Configuring the Single Sign On (SSO)
Before you start the procedure, check the following requirements:
- All servers with Windows Server 2019 or 2022 environment are connected in a domain;
- Domain Controller with AD user group is configured on Windows Server.
To configure and use the Single Sign On (SSO) with Fudo Enterprise, please follow below steps.
Note
Please note that this is a general guide, and specific details may vary depending on your Windows Server setup. Refer to the Windows Server documentation for precise configuration steps.
SSO configuration on Windows Server 2019
Add User:
- Log in to the server on which you want to setup the SSO using the administrator account.
- Open the Server Manager application.
- Click Tools button on the upper right corner of the window to expand the menu list and select Active Directory Users and Computers.

- In the Manager window, navigate to the domain name, or a specific user group, and right-click on the Users catalog.
- Select New > User.
- Create a user who will use SSO to log in to Fudo Enterprise (e.g.,
User logon name: ad-user1).
- Click Next.
- Provide the password for created user (e.g.,
PaSSwOrD) and select Password never expires option.- Click Next and Finish.

Configure DNS entries:
- Open the Server Manager application.
- Click Tools button on the upper right corner of the window to expand the menu list and select DNS.
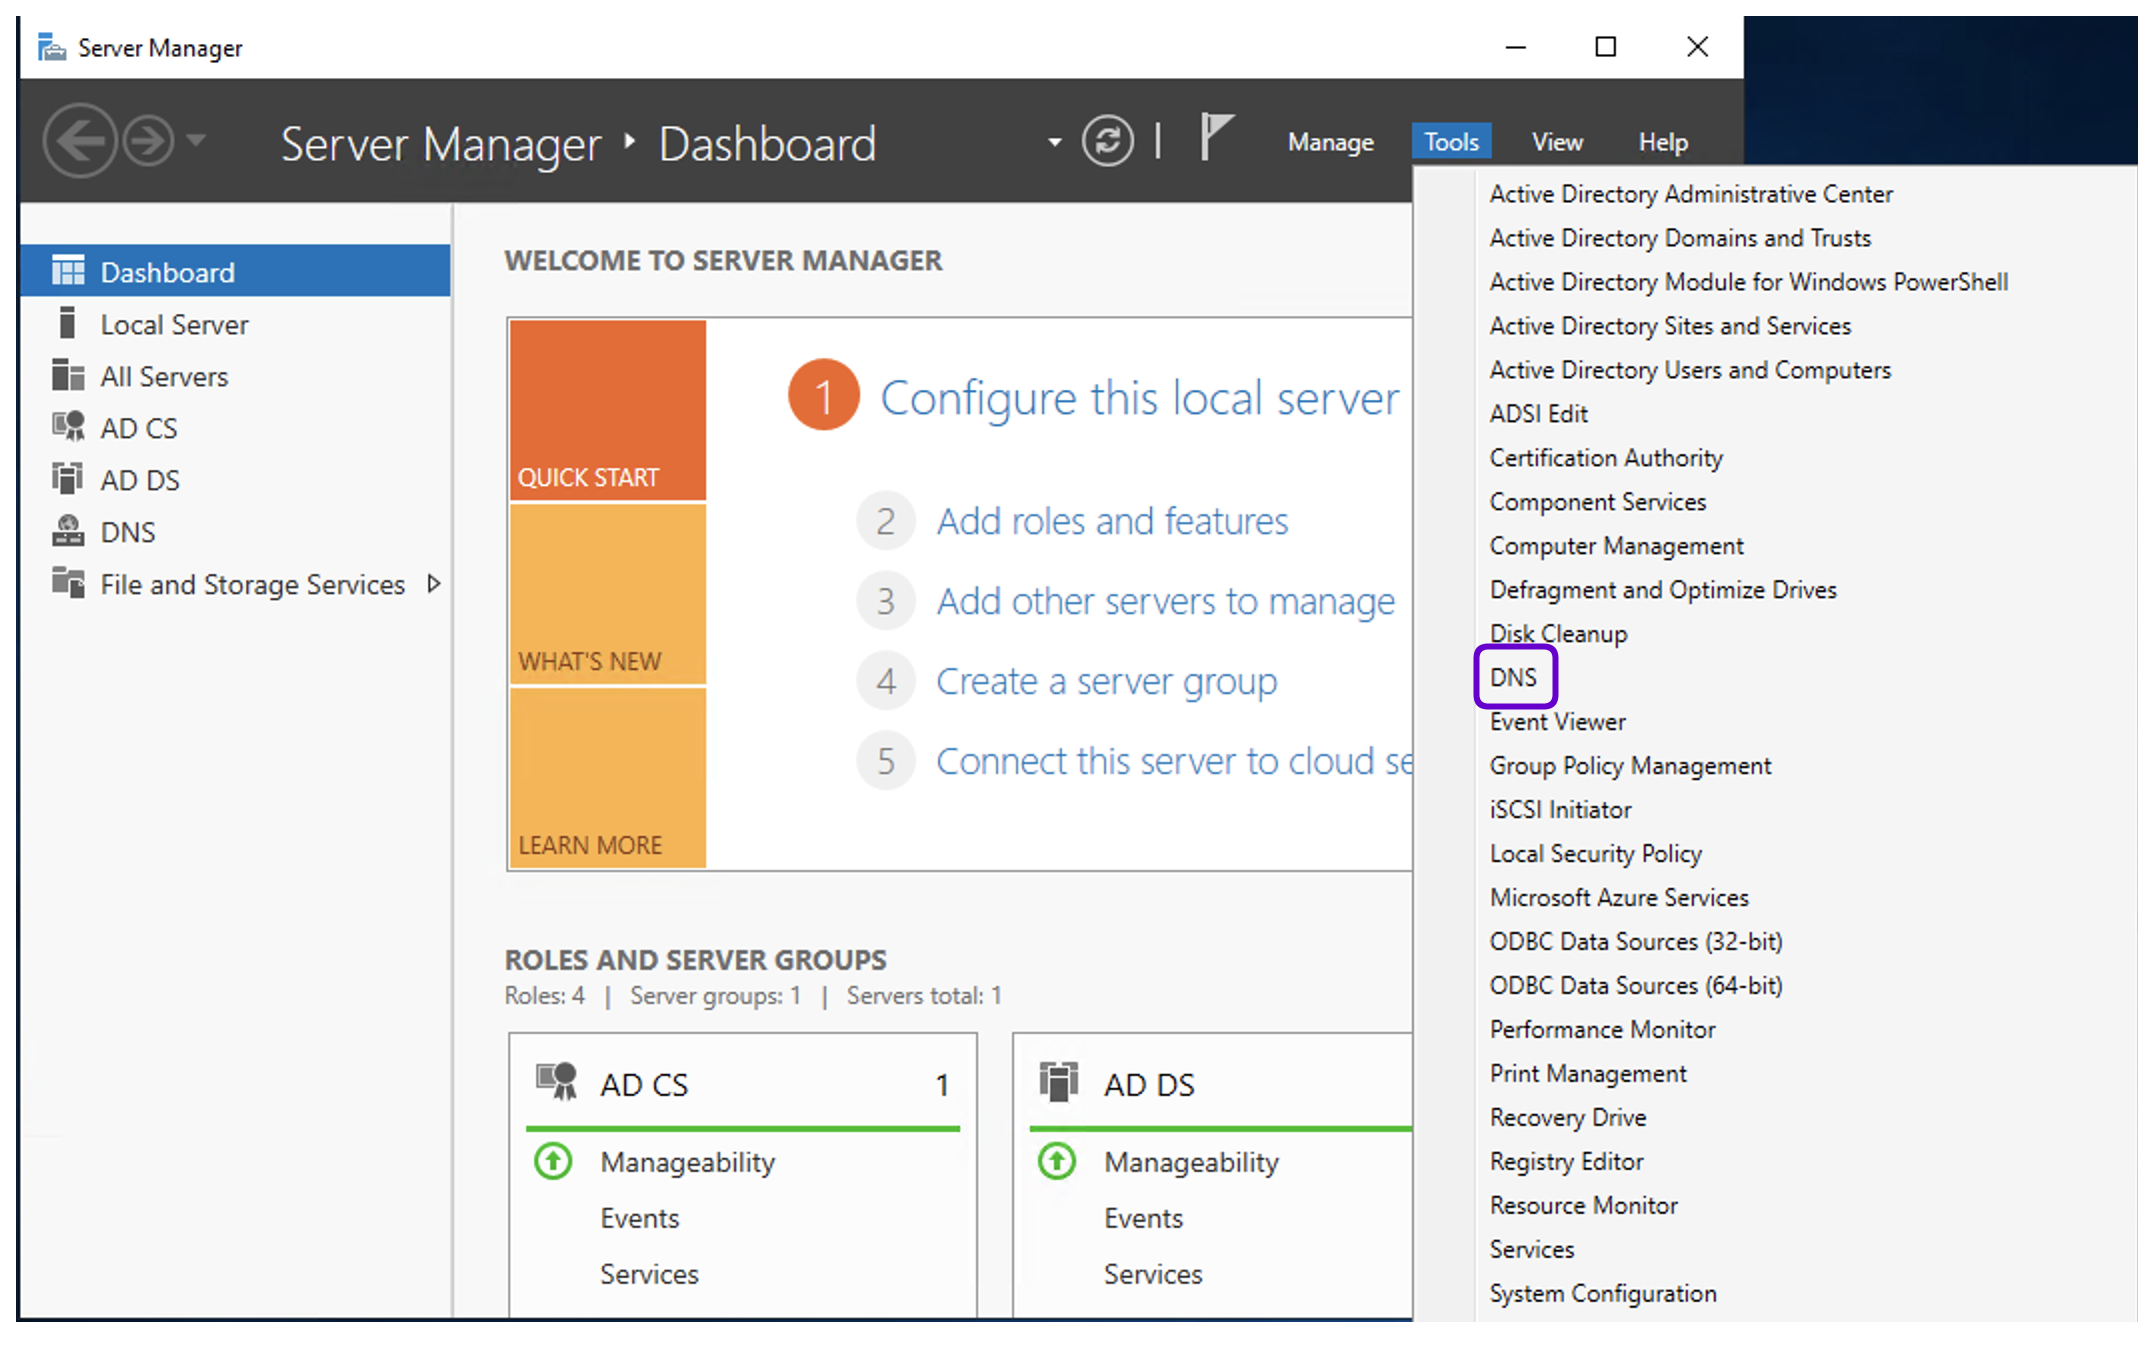
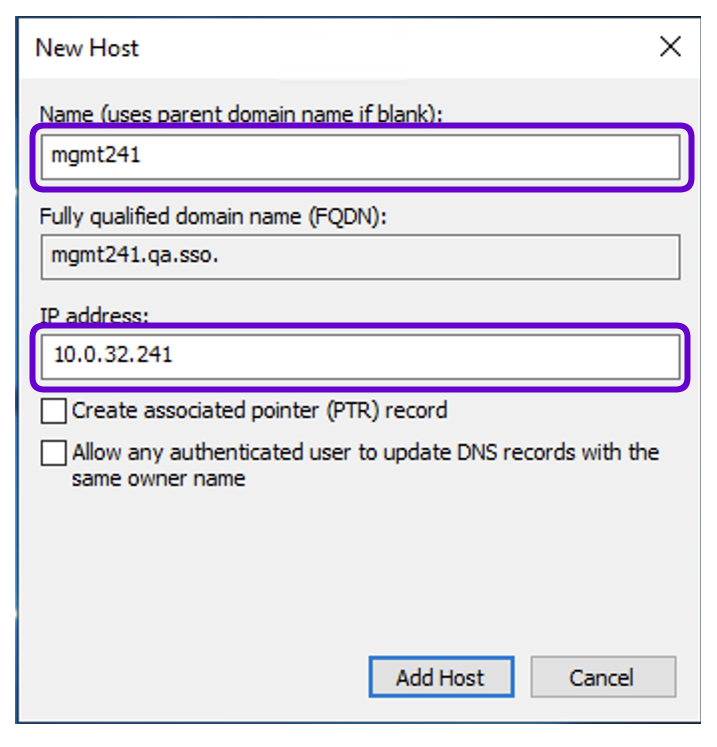
- Go to Forward Lookup Zones, right click on the domain name and select New Host.
- Provide the Name and IP address of the Fudo Enterprise Admin Panel (e.g.,
mgmt241.qa.sso, 10.0.32.241).- Click Add Host.
- Right click on Reverse Lookup Zone and select New Zone.
- Click Next.
- Select Primary zone option and click Next.
- Select To all DNS servers running on domain controllers in this domain: option and click Next.
- Select IPV4 Reverse Lookup Zone option and click Next.
- In the Network ID field, type in the start of the subnet range of your network (e.g.,
10.0.32) and click Next.
- Choose the dynamic update option (e.g., Allow only secure dynamic updates) and click Next.
- Click Finish.
- Right click on created zone
32.0.10.in-addr.arpaand select New Pointer (PTR).- Provide the Host IP Address and Host name of the Admin Panel (e.g.,
10.0.32.241andmgmt241.qa.sso).
Create Kerberos ticket:
Run the following command in the Powershell or CMD console:
ktpass -princ HTTP/hostname.yourdomain.local@yourdomain.local-mapuser netbios_domain_name\username -pass password -ptype KRB5_NT_PRINCIPAL-out hostname.yourdomain.local.keytab
- Example for this use case:
ktpass -princ HTTP/mgmt241.qa.sso@QA.SSO -mapuser QA\ad-user1-pass PaSSwOrD -ptype KRB5_NT_PRINCIPAL -out mgmt241.qa.sso.keytabCopy the generated keytab file to the workstation where you will be configuring Fudo.
Setup Fudo Enterprise
Note
This use case describes how to configure Fudo Enterprise using the Active Directory external authentication method. Please keep in mind that you can customize user authentication using other method supported by Fudo Enterprise to align with your specific requirements, the methods typically used in your environment, and your work scenarios.
Configure SSO:
In order to define SSO service parameters in Fudo Enterprise, follow the steps:
- Login into your Fudo Enterprise Admin Panel using the credentials for user with
superadminrole.
- Select > .
- In the Timezone section, check if the selected timezone is consistent with the Windows client timezone configuration.
Warning
Fudo Enterprise Timezone must match the Windows client timezone configuration.

- Select > .
- Go to Global tab.
- In the SSO section, click the button next to the Management SSO settings field.
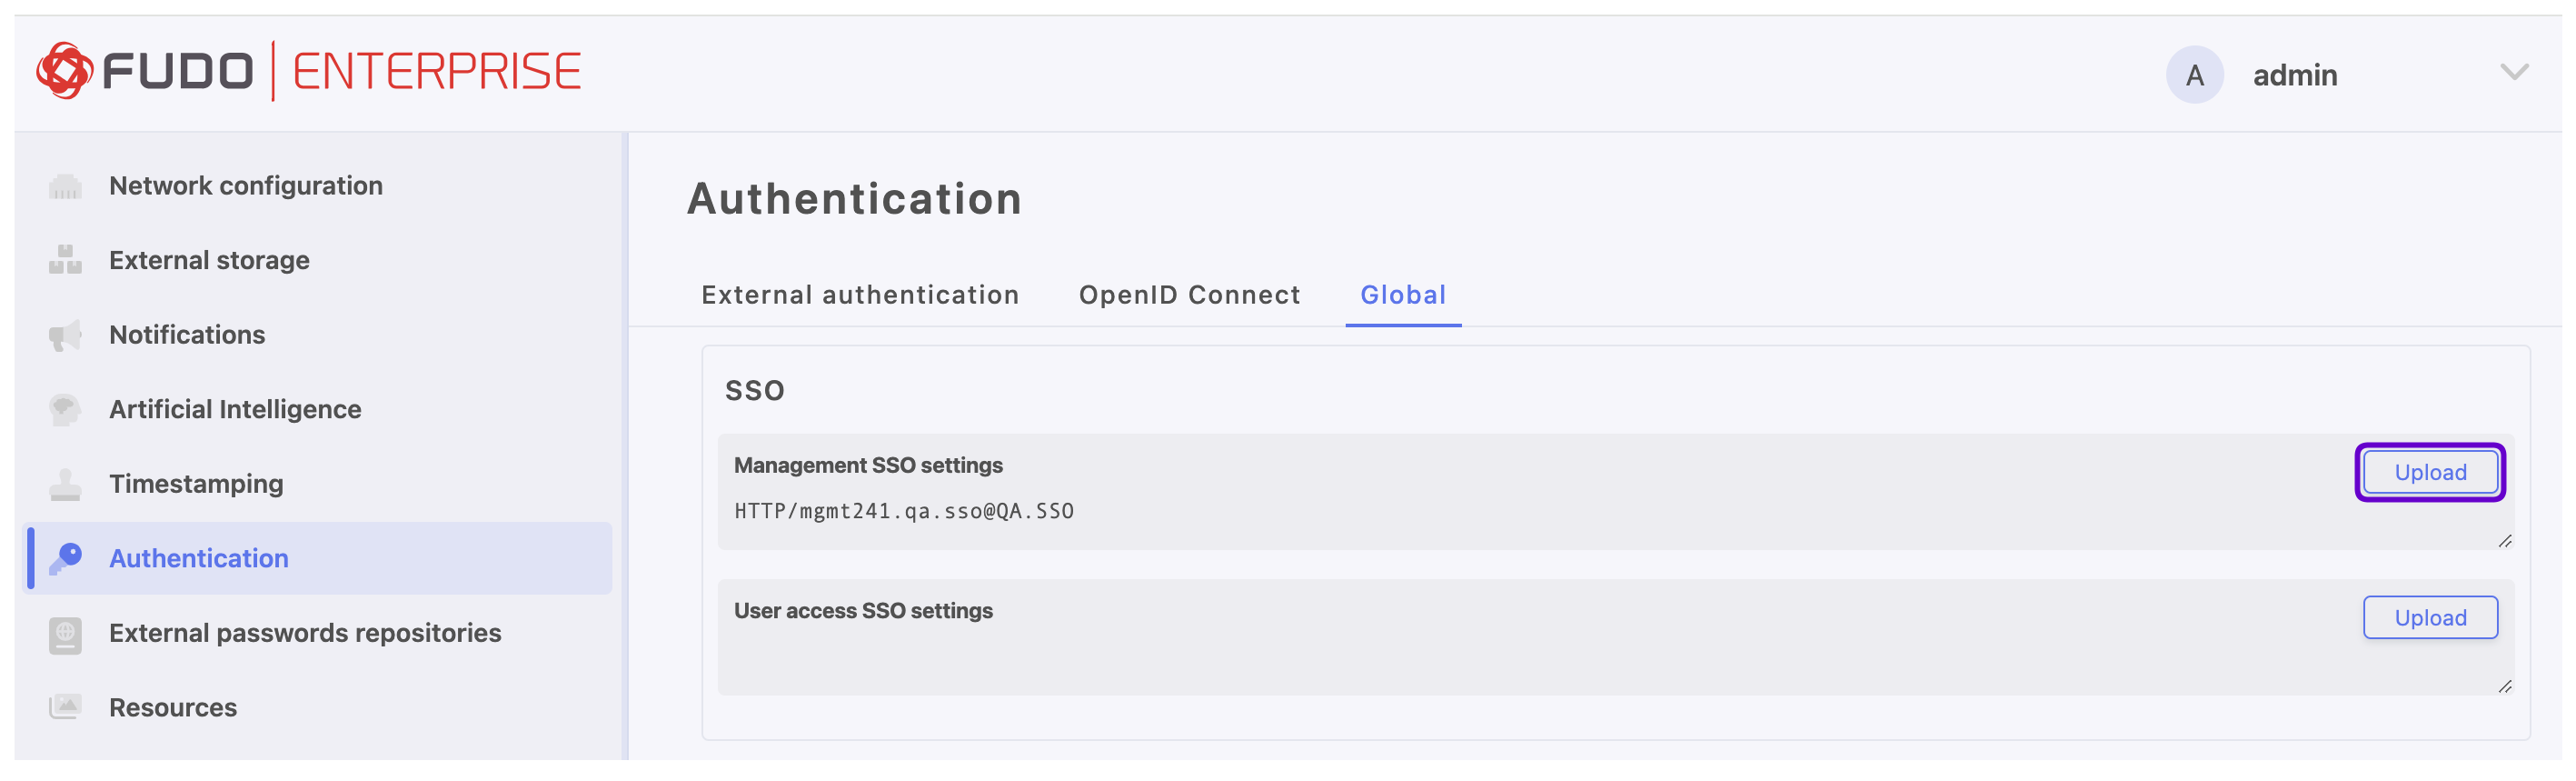
- In the Principal name field, provide service identifier that will match the user account with the service instance (e.g.,
HTTP/mgmt241.qa.sso@QA.SSO).- In the Keytab field, upload the keytab file containing user’s ID and encryption keys for encrypting and decrypting Kerberos tickets (generated in previous steps
mgmt241.qa.sso.keytabfile).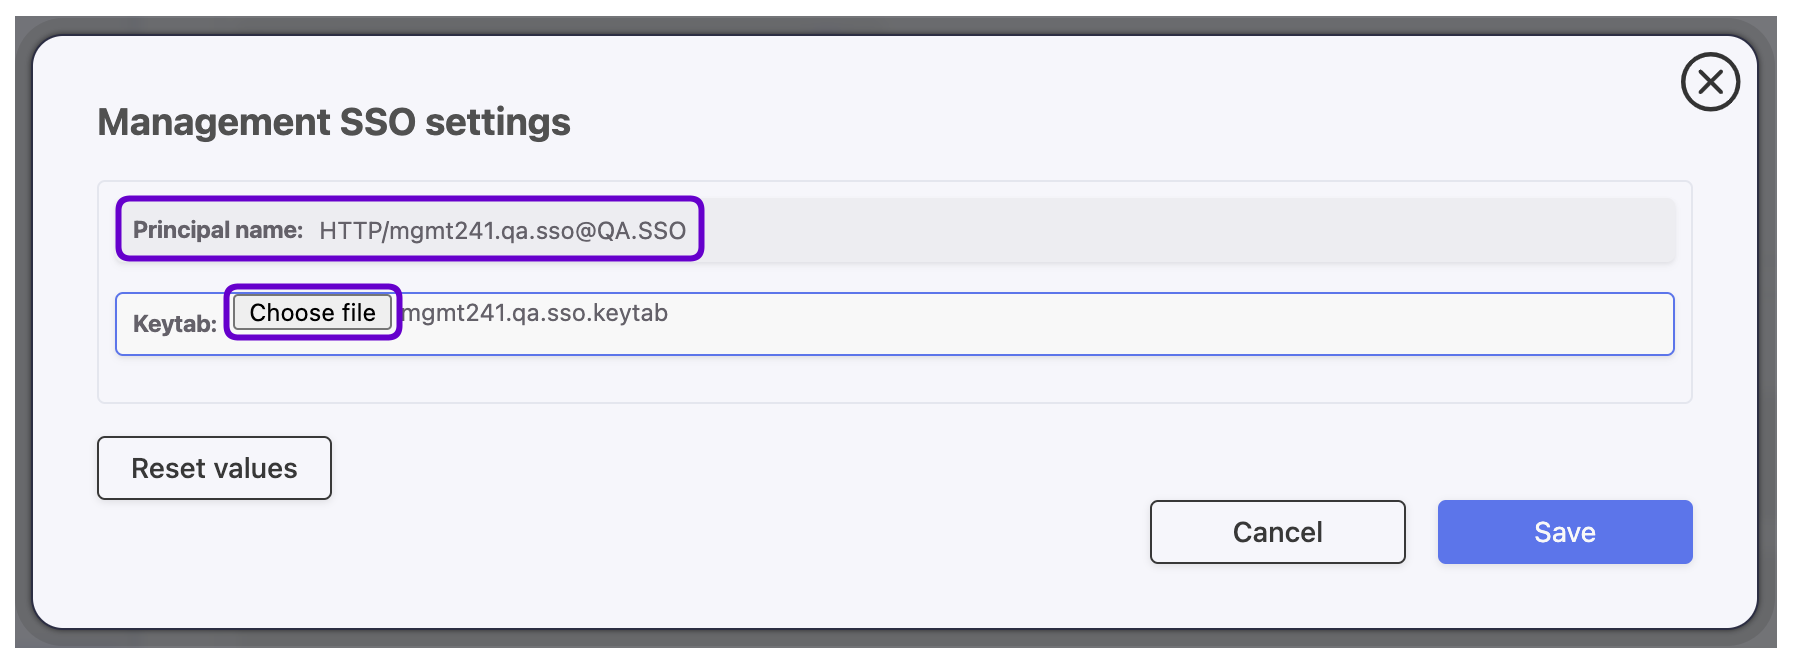
- Click .
Note
You can also configure SSO for the User Access Gateway by uploading the appropriately configured keytab file in the User Access SSO settings field. Remember to use the Access Gateway IP address when configuring the Windows environment.
Configure DNS:
- Go to > .
- Switch to the Name & DNS tab.
Enter
hostname.yourdomain.localin the Hostname field (e.g.,mgmt241.qa.sso).Configure DNS server to point to a DNS server in the yourdomain.local domain (in this example we will use a domain controller IP address):
- Click to define new DNS server.
- Enter DNS server IP address (e.g.,
10.0.242.100).- Click .
Configure external authentication method:
- Login into your Fudo Enterprise Admin Panel.
- Select > .
- In the External authentication tab click .
- In the Name field, provide a name for this configuration.
- Set the Bind address to Any.
- In the General field select Active Directory.
- In the Host field provide the Domain Controller IP address (e.g.,
10.0.242.100).- Leave default port number:
389.- Provide the name of the domain which will be used for authenticating users in Active Directory (e.g.,
qa.sso).- In the Login and Secret fields provide the privileged account’s login credentials used to access the Domain Controller.
- Click .
Create User in Fudo:
Warning
Single Sign On setup is available only for users with the
superadminrole, and can be used by users with theoperator,admin, andsuperadminroles.
- Select > and then click .
- Enter the user name that matches created in previous steps user account in Active Directory (e.g.,
ad-user1).- Select the
Adminrole.- In the Settings tab, under the Safes section, select main to grant access rights to the Admin Panel.
- Click .
- Go to the Authentication section and from the Add authentication method drop down list select External authentication.
- Chose created in previous steps Active Directory method and click .
- In the User Data tab, fill in the Fudo domain and AD domain (e.g.,
qa.sso).Note
Both the Fudo domain and AD domain should match the domain name specified in the Kerberos ticket.
- If necessary, please fill in the remaining parameters as needed for your specific configuration. For more details, please refer to the Creating a user section.
- Click .
Setup and check user workstation - Windows2010 Client
Firefox browser configuration:
- Log in to Windows Client using the
ad-user1account.- Open Firefox, type
about:configin the address bar, and press Enter.- A warning message will appear. Click on Accept the Risk and Continue option to proceed.
- In the search bar at the top, type
network.negotiate-auth.trusted-uris.- Double-click on the
network.negotiate-auth.trusted-urisand enter the desired FQDN (Fully Qualified Domain Name) with a protocol, separating entries with a comma (e.g.,https://mgmt241.qa.sso,https://uag242.qa.sso).- Press Enter to save the changes.

- Next, type in
network.automatic-ntlm-auth.trusted-urisin the search bar.- Double-click on the
network.automatic-ntlm-auth.trusted-urisand enter the desired FQDN (Fully Qualified Domain Name) with a protocol, separating entries with a comma (e.g.,https://mgmt241.qa.sso,https://uag242.qa.sso).- Press Enter to save the changes.
- Restart the browser.
Internet Explorer browser configuration:
- Navigate to Tools > Internet Options > Advanced.
- On the Advanced tab and in the Security section, select Enable Integrated Windows Authentication.

- On the Security tab, select Local Intranet.
- Click Custom Level.
- In the User Authentication/Logon section, select Automatic logon only in Intranet zone.

- Click OK.
- Click Sites and select all check boxes.
- Click Advanced and add Remedy SSO service website to the local zone (in our example, it’s
https://mgmt241.qa.sso).- Click Add.
- Click OK for all pop-ups.
- Uruchom ponownie przeglądarkę.
Chrome browser configuration:
Google Chrome supports Kerberos authentication. Once Internet Explorer is configured, no additional settings are needed for Google Chrome, as it relies on Internet Explorer’s configuration.
Log into the Admin Panel using SSO:
- Open the Firefox browser and enter the previously defined FQDN in the address bar ( in our example, it’s
https://mgmt241.qa.sso).- The Fudo Enterprise Admin Panel Dashboard will appear without the need to use login credentials.

Related topics: