Managing RDP Server certificates in Windows Server
While creating RDP Server in Fudo Enterprise, you can specify the server verification method by getting the server certificate or importing the CA certificate. You can follow below manual to manage mentioned certificates in the Windows Server environment.
Locating the Server Certificate in Windows Server
Please follow one of below scenarios to localize the certificate retrieved by Fudo Enterprise from the Widnows Server during the RDP server creation.
Locating the Server Certificate in Certificate Manager Tool:
You can localize the certificate retrieved by Fudo Enterprise from the Widnows Server in the Certificate Manager tool. To view the certificate, please follow below steps:
- Select Run from the Start menu in Widnows Server, and then enter
certlm.msc.- The Certificate Manager tool for the local device appears.
- To view your certificate, expand the Remote Desktop > Certificates directory under the Certificates - Local Computer in the left pane of the Certificate Manager tool window.

Locating the Server Certificate by the Serial Number:
You can also localize certificate used by Fudo Enterprise by extracting certificate’s serial number.
After clicking the ‘Get certificate’ button, Fudo Enterprise connects to the specified address and port to retrieve the certificate. A similar action can be performed from the command line by invoking below command:
openssl s_client -connect adres:portExample:
openssl s_client -connect 10.0.133.4:3389In the response you will receive the certificate that you can use to extract the certificate serial number by typing below command and providing the obtained certificate content:
c x509 -noout -serial

-----BEGIN CERTIFICATE-----
MIIChbdygdu656sdf65ac55mpn1PmpBK/70WFeh+xjANBgkqhkiG9w0BAQsFADAZ
MRcwFQYDVQQDEw5IT1NUMS5tay5sb2NhbDAeFw0yMzA5MTMxNzA2NTRaFw0yNDAz
MTQxNzA2NTRaMBkxFzAVcas7c6c6sh83uydtLm1rLmxvY2FsMIIBIjANBgkqhkiG
9w0BAQEFAAOCAQ8AMIIBCgKCAQEA2ngYkoMa4dgLgGl1+G+m2UEAIH/6ttyQep5u
tUYkxKeuqpn9AWnYP8To1fornJN387ddhcy76d7jchc8Q093RWVb2cMKKjgOAW9w
qLFW+WrLEUPY8hYvsCFYgFH3H0HhKLEoWBN5qHH7vjIiW3Rb0Y7xeGb9x0FWItQX
mbF6sucGdlH+OsjepxMLPVh3Qpb2WQ18kSQGyS1ocbJxOWST9sH4MQkRVFL3rkxN
f7/qdJcdM6sFxEJTdp30CITRfbORXacl84bStjW2MJzvJRqr94xDHonRdIM9tUka
06LVJQY6qiEpMVE8MpSDAfoZ+HeyVWt+2EfXlfWE4hiMJP1DoQIDAQABoyQwIjAT
BgNVHSUEDDAKBggrBgEFBQcDATALBgNVHQ8EBAMCBDAwDQYJKoZIhvcNAQELBQAD
ggEBAGNXzwNC4DhOxyaVhVTPePsa97aeWJtpl64cE4/ZdAfGBEIfHlBEh/Tnrrn2
7pr0jLnCjUq9rxHC6jfMR0U2PT4qrMHvGD1nUwZdHuZPavPLFHh/rYHZpizoS+9W
ggEBAGNXzwNC4DhOxyaVhVTPePsa97aeWJtpl64cE4/ZdAfGBEIfHlBEh/Tnrrn2
xyXjeYdX8/U9EdgrXOLGX9U74rfGQTrQxZyjuYlGxxqop/y2V3n+3NnNzY+ehW1G
ggEBAGNXzwNC4DhOxyaVhVTPePsa97aeWJtpl64cE4/ZdAfGBEIfHlBEh/Tnrrn2
ZUvdUnqtdH+0DdAWBo4P1dv0nL8=
-----END CERTIFICATE-----
This will result in extracting the certificate’s serial number that you can use to search the exact certificate in the Certificate Manager tool.
serial=41EB33A67D4F9A884AFFBD1615E11EDDCopy extracted serial number and go to the Windows Server.
Select Run from the Start menu, and then enter
certlm.mscto open the Certificate Manager tool.Go to Action > Find Certificates...

- Provide copied serial number in the Contains field and select Serial Number from the Look in Field drop down list.
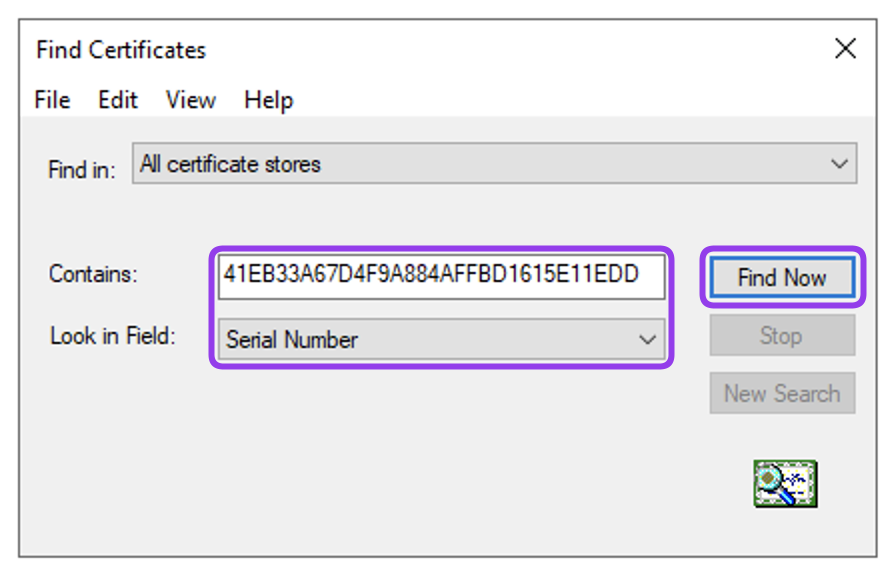
- Click Find Now.
Providing the CA Certificate
Note
- This is a conceptual guide that outlines the fundamental setup of a CA for the RDP protocol. The necessary steps may vary depending on the initial settings of the environment in which you are working.
- To prepare CA certificate to be used in Fudo Enterprise it is needed to deploy internal Certificate Authority on the network with an RDP certificate template to issue RDP certificates.
Install the Certificate Authority on Windows Server:
To install the Certificate Authority on Windows Server, follow the default configuration as specified in the manufacturer’s manual.
Note
For the procedure outlined in the manual below, the Enterprise CA option was selected.
Create a Template for RDP Certificate:
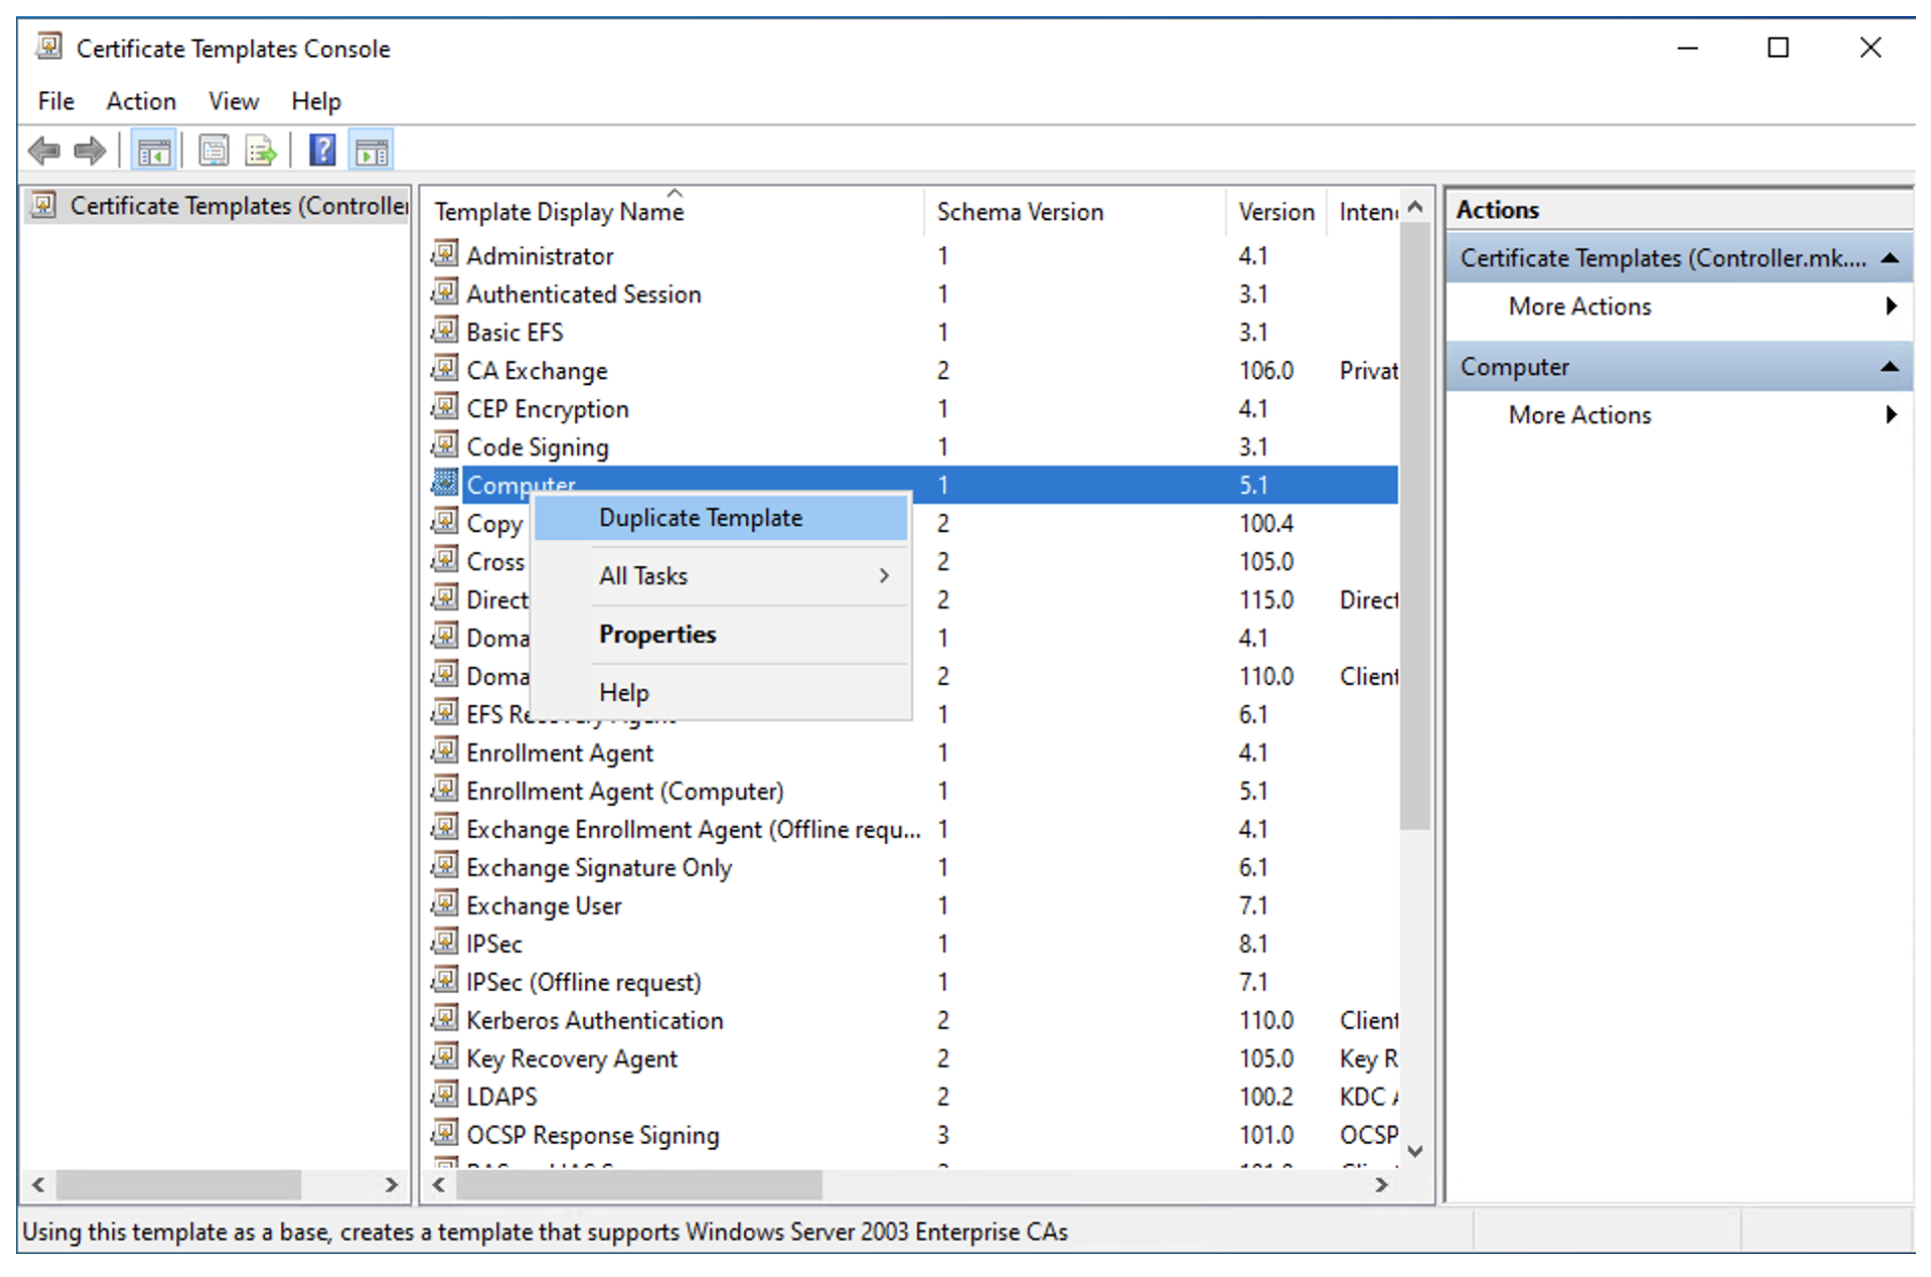
- Open the Certificate Authority from the Server Manager by clicking Tools > Certification Authority in the upper right corner of the window.

- Right click on the Certificate Template and choose Manage.

- Find the Computer template, right click on it and choose Duplicate Template.
- In the General tab, enter the name for new template and specify the validity and renewal period according to your needs.

- In the Compatibility tab, choose Windows Server 2003 from the
Certification Authoritydrop-down list andWindows XP/ Server 2003from the Certificate recipient drop-down list.
- In the Request Handling tab, set the Purpose to the Signature and encryption and check the Allow private key to be exported.

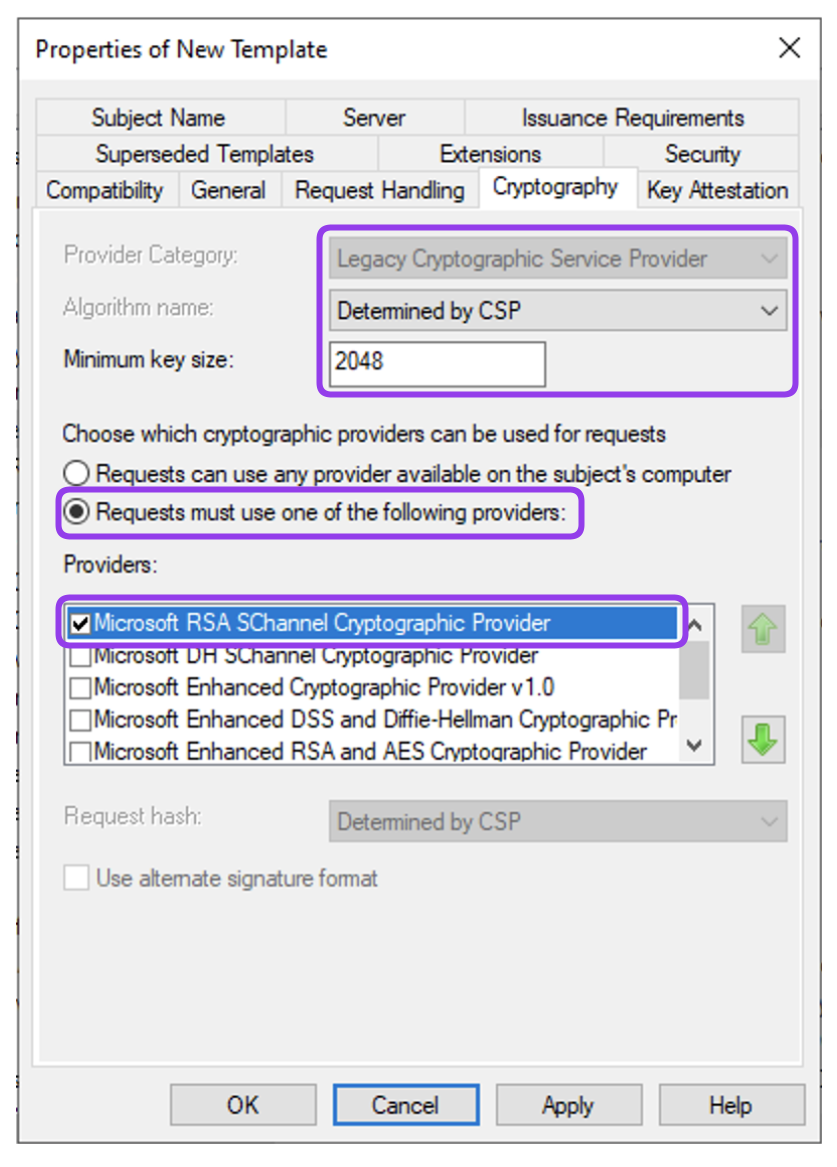
In the Cryptography tab, choose:
- set the Provider Category to Legacy Cryptography Service Provider,
- set the Algorithm name to Determined by CSP,
- set the Minimum Key Size according to organisation security requirement (e.g., 1024).
- choose the Request must use one of the following providers option and select the Microsoft RSA SChannel Cryptographic Provider.
- In the Key Attestation tab, leave default settings.

- In the Server tab, leave default settings.

- In the ‘Security’ tab, add the computers and groups you want to be able to enroll for this template. Check if group or user you are using has the Read, Write, and Enroll permissions enabled. It is needed to request the certificate using this template in the next steps.
- In the Extensions tab, edit the Application Policies.
- Remove the Server Authentication and Client Authentication policies.
- Add new policy by clicking Add, and New in the next window.
- In the Name field enter
Remote Desktop Authenticationand in the Object identifier field type1.3.6.1.4.1.311.54.1.2.
- Click three times OK to return to the Properties of New Template window.
- In the Subject Name tab, select Build from this Active Directory information option and next the DNS name.

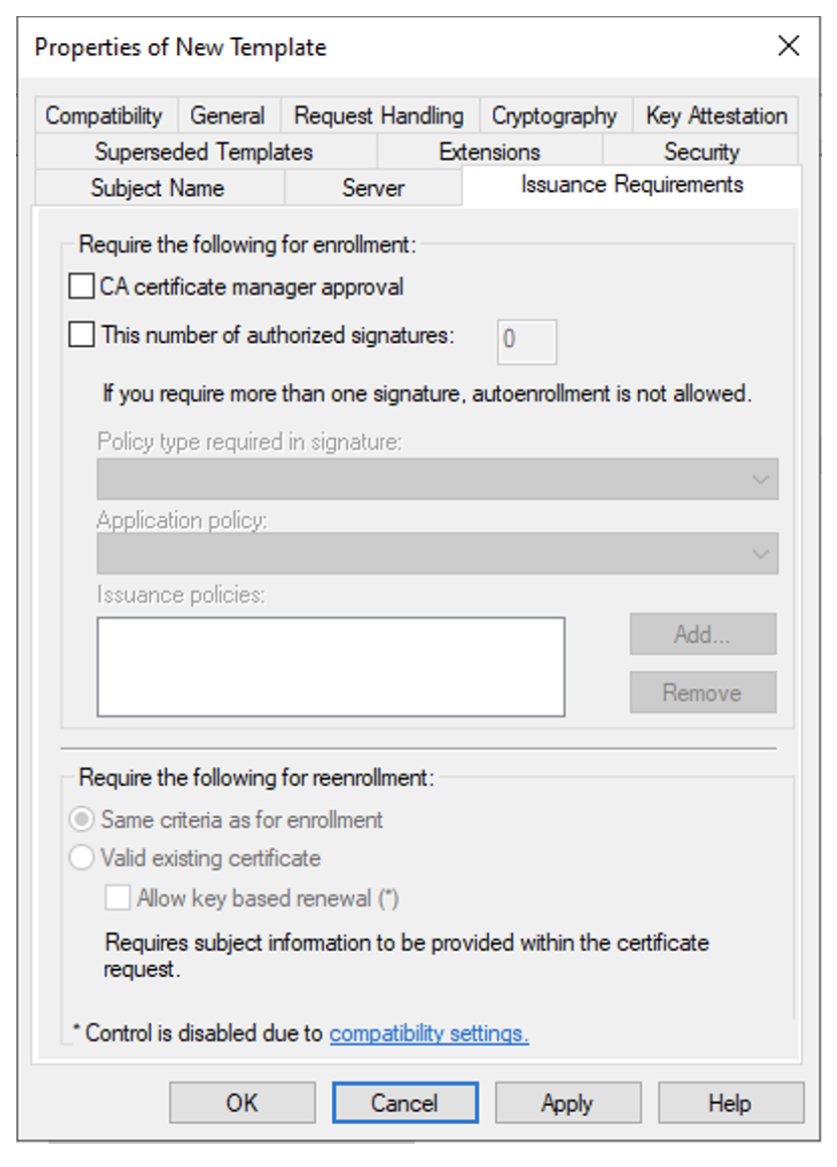
- In the Issuance Requirements tab, leave default settings.
- Click OK to save created template. Close the Certificate Templates Console.
- Go back to the Certification Authority window. Right click on the Certificate Template and choose New > Certificate Template to Issue.

- Select created template and click OK.

Configure a GPO to Deploy the Template
- Press
Win + R, typegpmc.msc,and press Enter to open the Group Policy Management on the server.- Create new Group Policy Object (GPO), or navigate to the GPO, you are going to edit. In this example we will create new one.
- Right click on the domain name and choose Create a GPO in this domain, and Link it here…
- Provide a name for new GPO (e.g., rdp) and click OK.

- Right click on the name of created GPO and select Edit….
- In the Group Policy Management Editor navigate to Computer Configuration > Policies > Administrative Templates > Windows Components > Remote Desktop Services > Remote Desktop Session Host > Security.
- Double-click on the Server authentication certificate template to edit this setting.
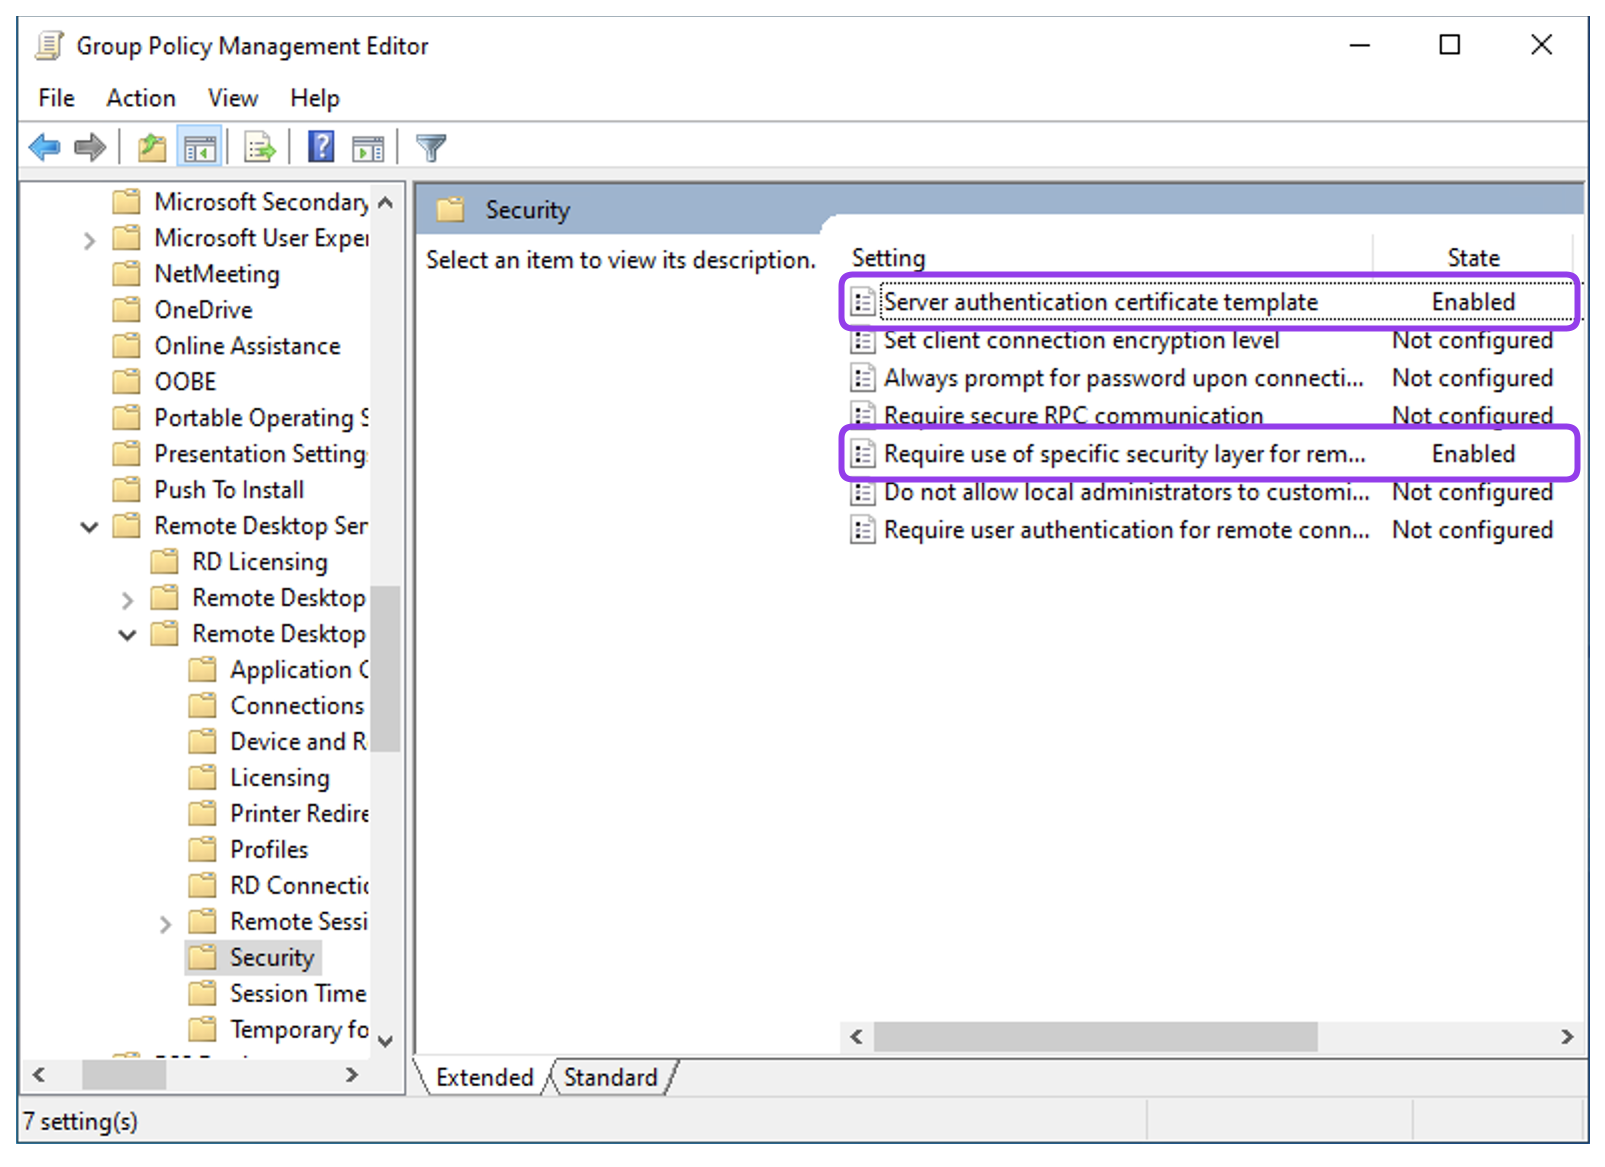
- Select Enabled option and enter the name of the template created in the previous steps into the Certificate Template Name field.
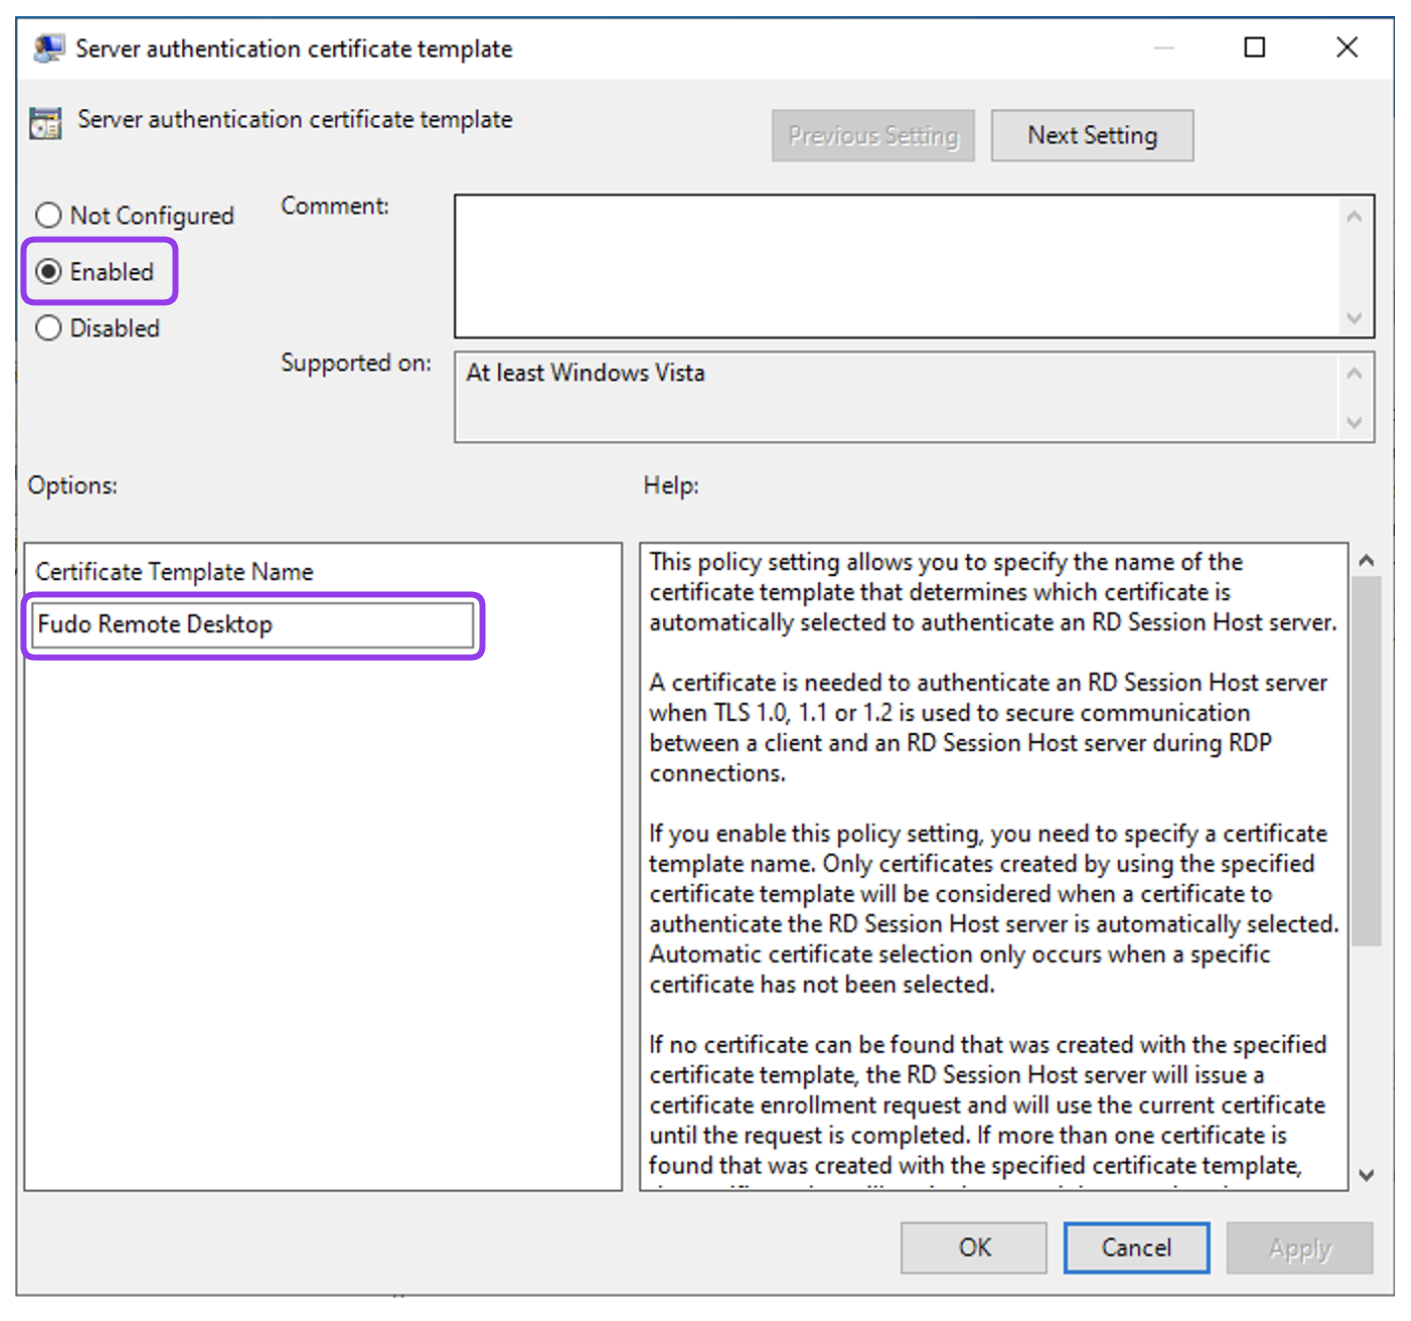
- Click OK.
- Double click on the Require use of specific security layer for remote (RDP) connections to edit this setting.
- Select Enabled option and choose
SSLfrom the Security Layer drop-down menu.
- Click OK.
- Link the GPO to the OU containing your servers / desktops that need RDP certificates if needed. They will auto enroll when Group Policy is updated.
Enroll the RDP Certificate
- Press
Win + R, typecertlm.msc, and press Enter to open the Certificate Manager tool for the local device.- Navigate to Personal > Certificates.
- Right-click in the manager window and select All Tasks > Request New Certificate….
- Click Next on the Before You Begin and on the Select Certificate Enrollment Policy tabs.
- On the Request Certificate tab, select the template created in previous steps and click Enroll.
- Copy the enrolled certificate to the Trusted Root Certification Authorities > Certificates directory.
Export the CA Certificate
- Press
Win + R, typecertlm.msc, and press Enter to open the Certificate Manager tool for the local device.- Navigate to Trusted Root Certification Authorities > Certificates.
- Right-click on your Root Certification Authority certificate and select All Tasks > Export….
- Click Next.
- Select Base-64 encoded X. 509 (.CER) format and click Next.
- Specify the name and localisation for the exported certificate.
- Click Next and Finish to save the file.
Create User in Fudo:
- Select > and then click .
- Enter the user name (e.g., ‘User1’).
- In the Settings tab, under the Safes section, select portal.
- Click .
- Go to the Authentication section and from the Add authentication method drop down list select Static password.
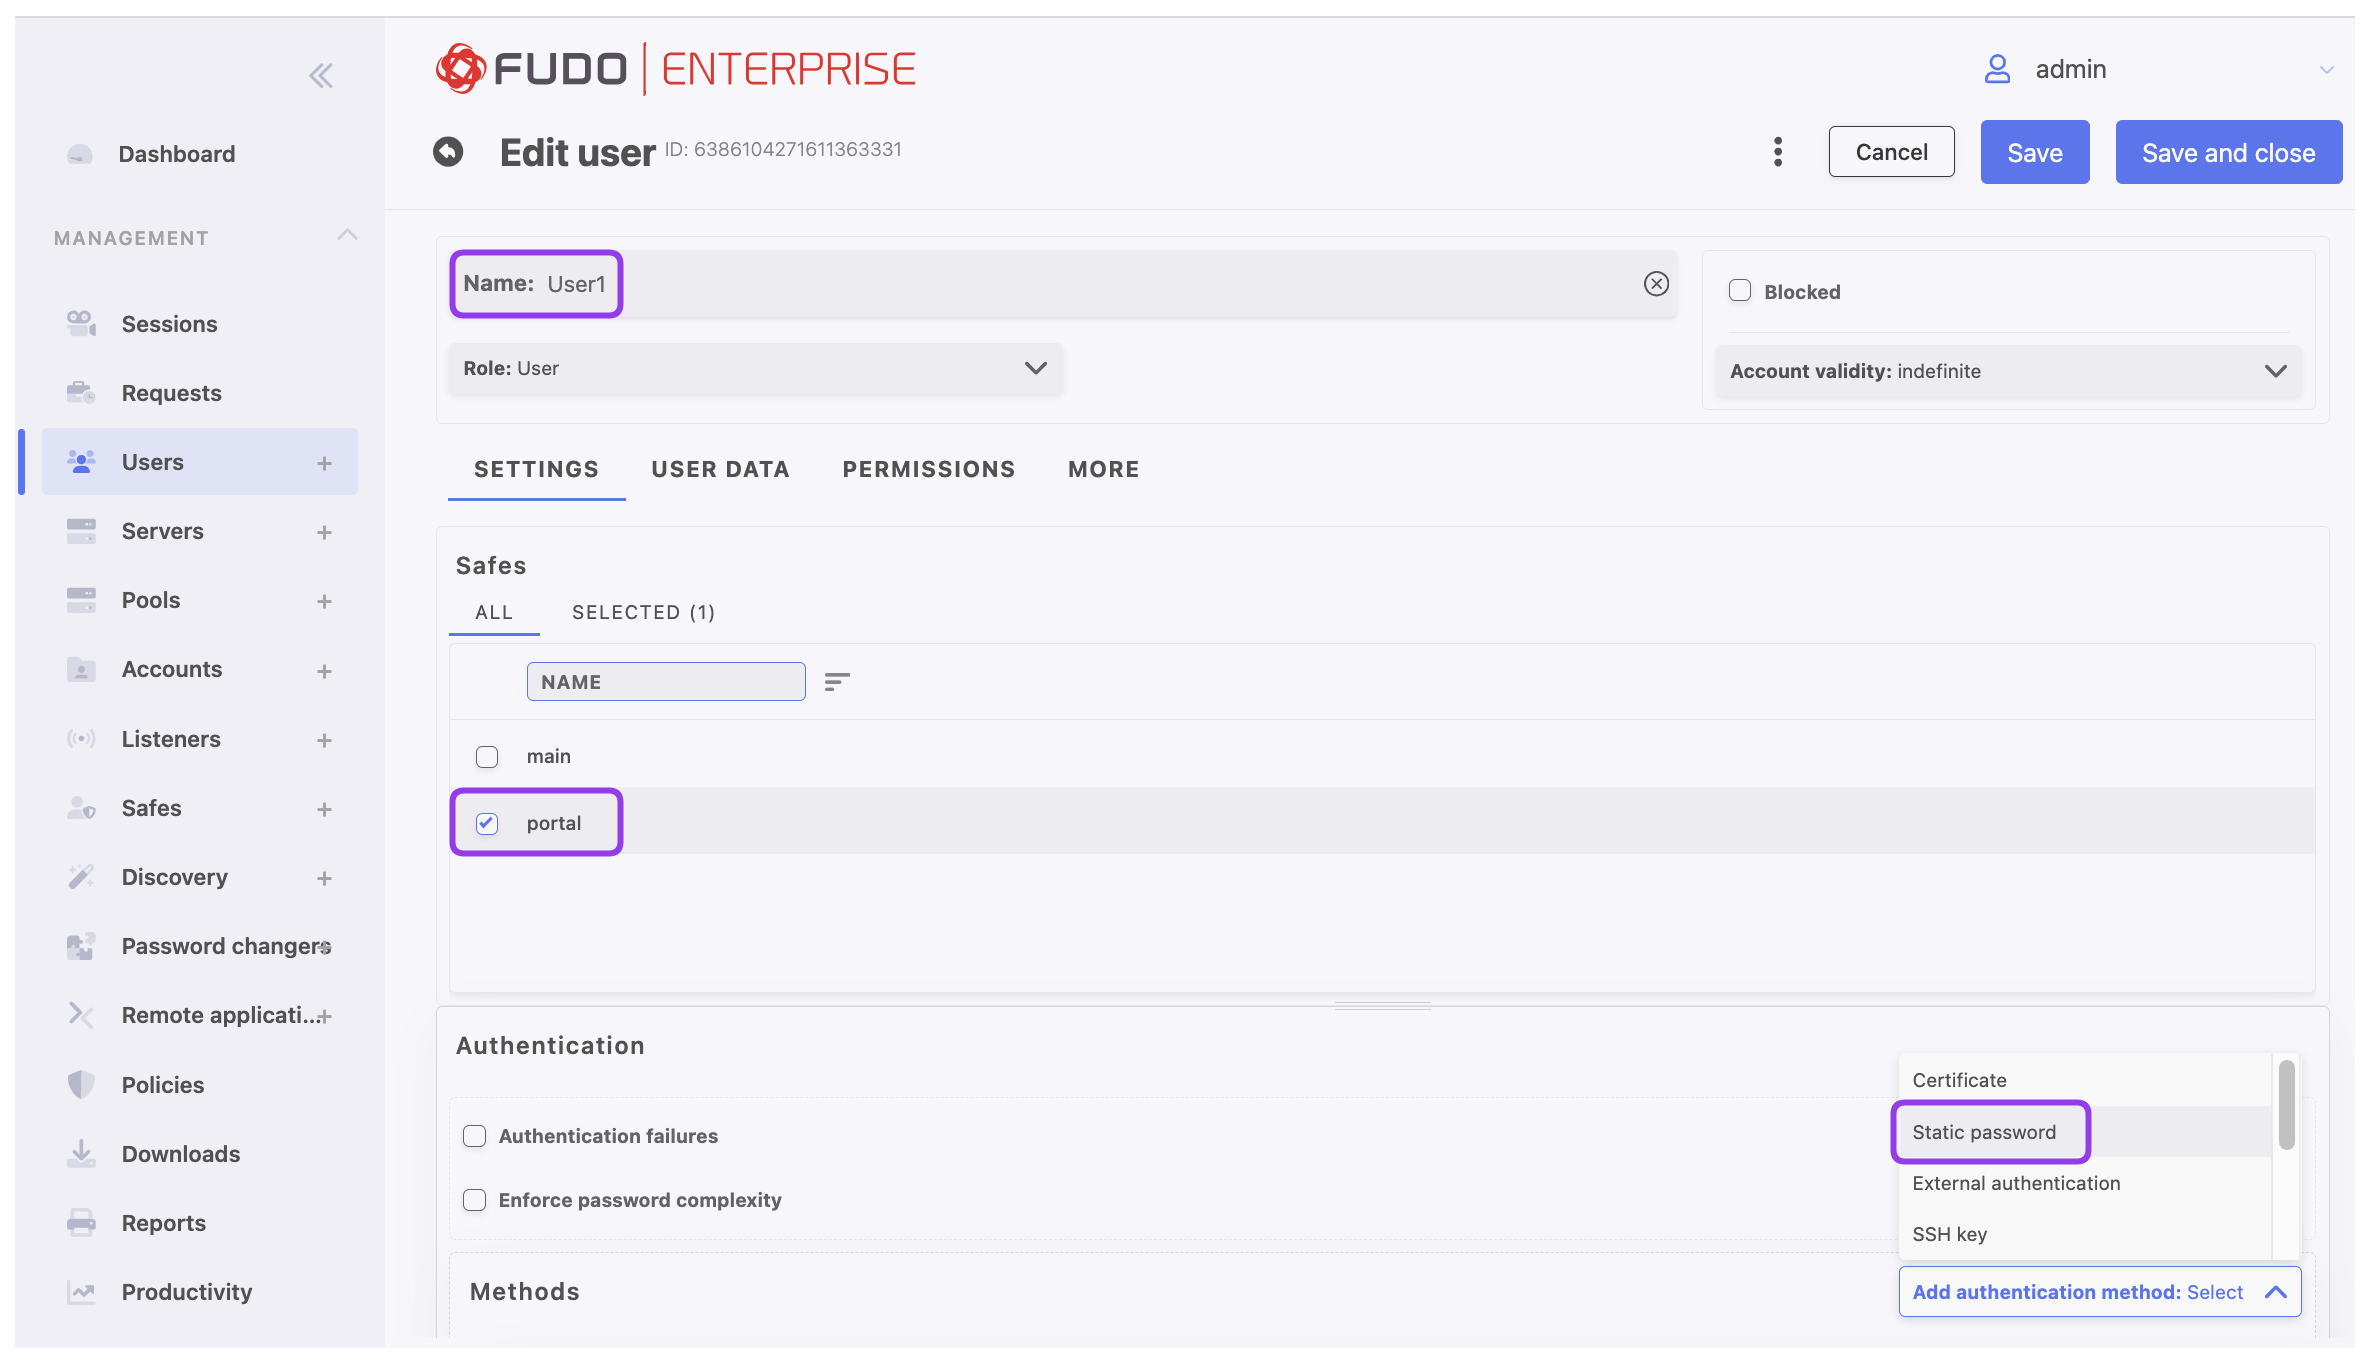
- Provide password and click .
- If necessary, please fill in the remaining parameters as needed for your specific configuration. For more details, please refer to the Creating a user section.
- Click .
Configure RDP Server:
- Select > and then click .
- Enter server’s unique name (e.g.,
ServerRDP).- In the Permissions section, add users allowed to manage this object.
- In the Settings section on the list of available protocols select
RDP.
- Select the TLS enabled and the NLA enabled options.
- In the Destination section select
IPv4and enter IP address of the server for which you wish to set up an RDP connection.- In the Server verification section select CA certificate and upload exported CA certificate file.

- Click .
Configure Account:
- Select > and then click .
- Define object’s name (e.g.,
CA-account).- Select
regularfrom the Type drop-down list.- Go to the Server / Pool section and from the drop down list select the server created in previous step (e.g.,
ServerRDP) to assign created account to this server.- In the Credentials section provide the Domain and Login used to authenticate on the server.
- From the Replace secret with drop down list select password, and provide password used to authenticate on the server.
- Click .
Configure Listener:
- Select > and then click .
- Enter listener’s unique name (e.g.,
RDP-bastion).- Go to Permissions tab and add users allowed to manage this listener (e.g.,
User1).
- Go to Settings tab and press the button in the Protocol field.
- Select the TLS enabled option to enable encryption.
- Check the NLA enabled option for additional security.
- In the Connection mode section, select .
- Set the local address to
anyand port3389.- In the Server certificate field, click Generate certificate to generate TLS certificate by choosing key algorithm and providing Common Name (server name where the certificate is installed).

- Click .
Configure Safe:
- Select > and then click .
- Enter object’s name (e.g.,
SafeRDP).
- Select Web Client option to allow connecting to the session in browser.
- Select Users tab to assign users allowed to access accounts assigned to this safe.
- Click , and then click the . button next to
User1,which was created in previous steps, to enable server access over monitored safe.- Click ok to close the modal window.
Select Accounts tab to add account accessible through this safe.
- Click , and then click the . next to
CA-account,which was created in previous steps.- Click ok to close the modal window.
- Click . to assign listener to accounts.
- Click . to add listener
RDP-bastioncreated in previous steps.- Click ok` to close the modal window.
Click .
Establish a session:
- Log in to the Fudo Enterprise Access Gateway using
User1as the username and password provided during the creation of this user.- Hover the cursor over the
CA_accountname and select Web client to start the session.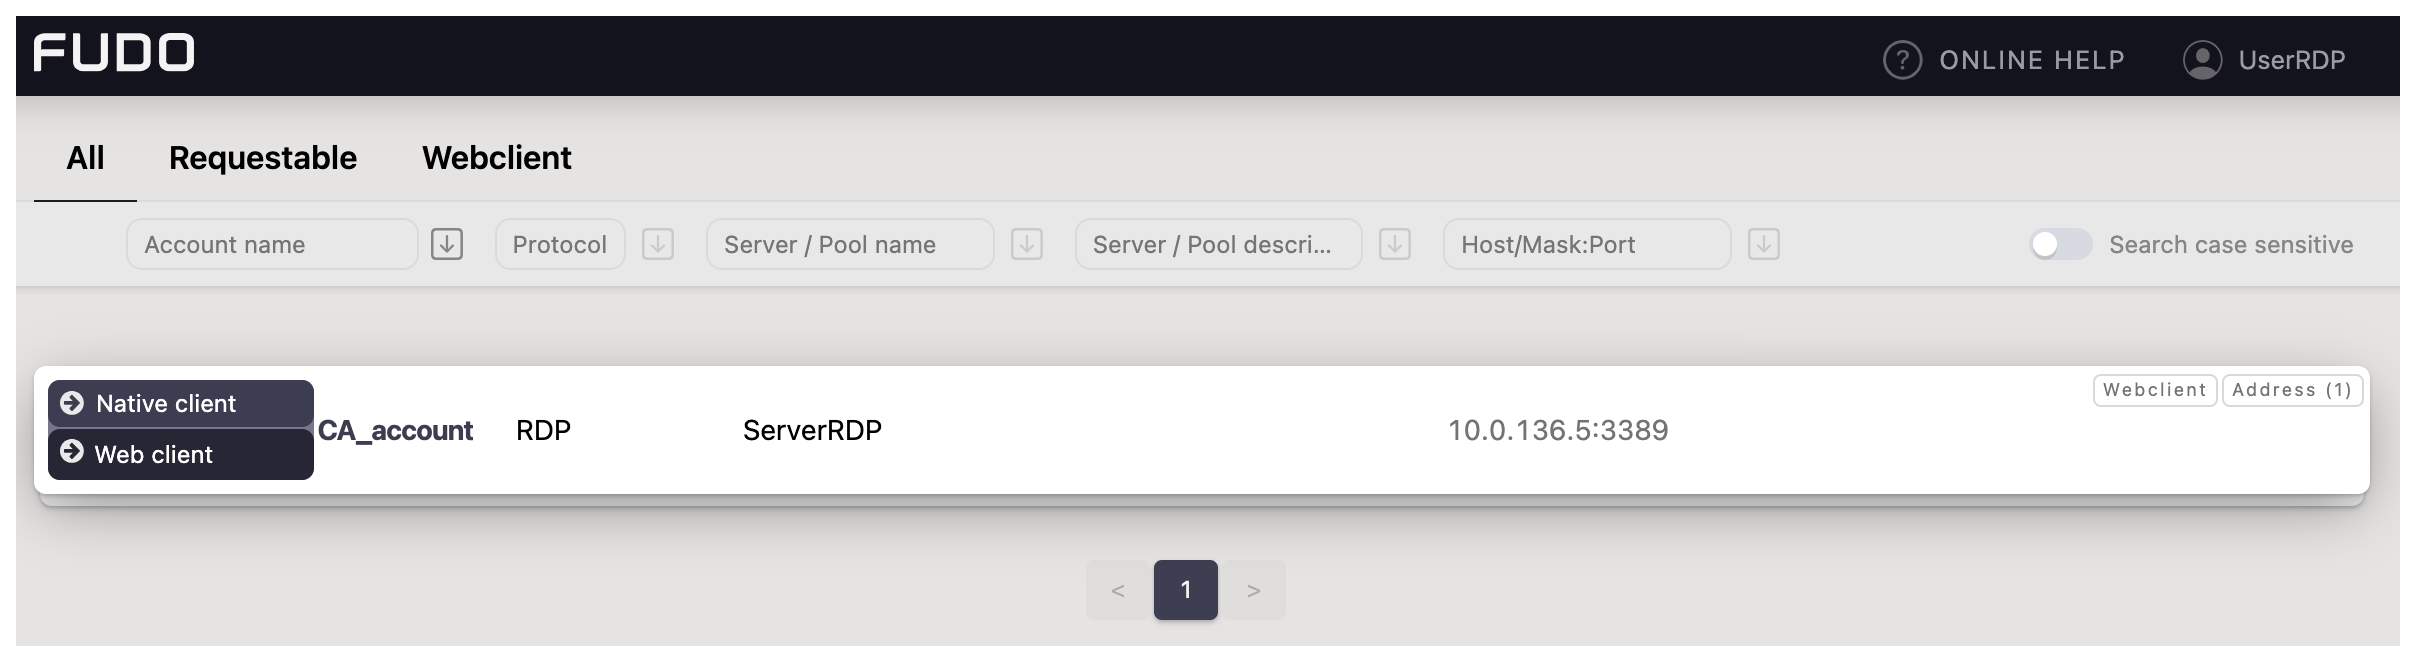
Related topics: