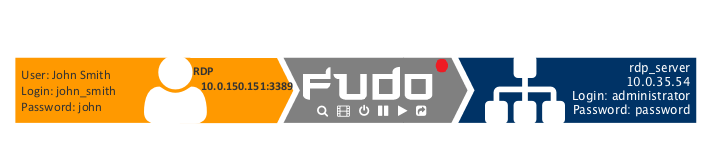
RDP in bastion mode
This chapter contains an example of a basic Fudo PAM configuration, to monitor RDP access to a remote server. In this scenario, the user connects to the remote server in bastion mode by specifying the privileged account in the username string. Bastion mode enables facilitating privileged accounts monitoring while preserving default protocols port numbers.
Prerequisites
Description below assumes that the system has been already initiated. The initiation procedure is described in the System initiation topic.
Configuration

Adding a server
is a definition of the IT infrastructure resource, which can be accessed over one of the specified protocols.
- Select > .
- Click and select Static server.
- Provide essential configuration parameters:
| Parameter | Value |
|---|---|
| Name | rdp_server |
| Description |  |
| Blocked | |
| Protocol | RDP |
| Security | Standard RDP Security |
| Bind address | 10.0.150.151 |
| Permissions | |
| Granted users | |
| Server addresses | |
| IP address | 10.0.234.6 |
| Port | 3389 |
- Click i to download the target server’s public key.
- Click .
Adding a user
User defines a subject entitled to connect to servers within monitored IT infrastructure. Detailed object definition (i.e. unique login and domain combination, full name, email address etc.) enables precise accountability of user actions when login and password are substituted with a shared account login credentials.
- Select > .
- Click .
- Provide essential user information:
| Parameter | Value |
|---|---|
| General | |
| Login | john_smith |
| Fudo domain | |
| Blocked | |
| Account validity | Indefinite |
| Role | user |
| Preferred language | English |
| Safes | |
| Full name | John Smith |
john@smith.com |
|
| Organization | |
| Phone | |
| AD Domain | |
| LDAP Base | |
| Permissions | |
| Granted users | |
| Authentication | |
| Authentication failures | |
| Enforce static password complexity | |
| Type | Password |
| Password | john |
| Repeat password | john |
- Click .
Adding a listener
determines server connection mode (proxy, gateway, transparent, bastion) as well as its specifics.
- Select > .
- Click .
- Provide essential configuration parameters:
| Parameter | Value |
|---|---|
| General | |
| Name | rdp_listener_bastion |
| Blocked | |
| Protocol | RDP |
| Security | Standard RDP Security |
| Announcement | |
| Permissions | |
| Granted users | |
| Connection | |
| Mode | bastion |
| Local address | 10.0.150.151 |
| Port | 3389 |
| External address | |
| External port | |
- Click i to generate the proxy server’s private key or i to upload the .PEM file private key definition.
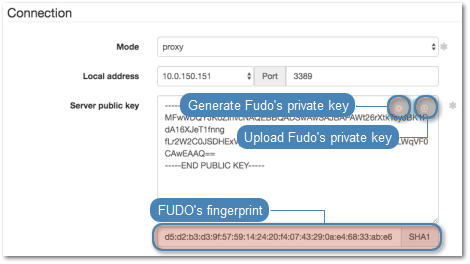
Note
For security reasons the form displays server’s public key derived from the generated or uploaded private key.
- Click .
Adding an account
defines the privileged account existing on the monitored server. It specifies the actual login credentials, user authentication mode: anonymous (without user authentication), regular (with login credentials substitution) or forward (with login and password forwarding); password changing policy as well as the password changer itself.
- Select > .
- Click .
- Provide essential configuration parameters:
| Parameter | Value |
|---|---|
| General | |
| Name | admin_rdp_server |
| Blocked | |
| Type | regular |
| Session recording | all |
| OCR sessions |  |
| OCR Language | English |
| Notes | |
| Data retention | |
| Override global retention settings | |
| Delete session data after | 61 days |
| Permissions | |
| Granted users | |
| Server | |
| Server | rdp_server |
| Credentials | |
| Domain | |
| Login | administrator |
| Replace secret with | with password |
| Password | password |
| Repeat password | password |
| Password change policy | Static, without restrictions |
- Click .
Defining a safe
directly regulates user access to monitored servers. It specifies available protocols’ features, policies and other details concerning users and servers relations.
- Select > .
- Click .
- Provide essential configuration parameters:
| Parameter | Value |
|---|---|
| General | |
| Name | rdp_safe |
| Blocked | |
| Notifications | |
| Login reason | |
| Require approval | |
| Policies | |
| Note access | No access |
| Protocol functionality | |
| RDP | |
| SSH | |
| VNC | |
- Select Users tab.
- Click .
- Find John and click ..
- Click .
- Select Accounts tab.
- Click .
- Find the
admin_rdp_serverobject and click .. - Click .
- Click in the Listeners column.
- Find the
rdp_listener_bastionobject and click .. - Click .
- Click .
Establishing an RDP connection with a remote host
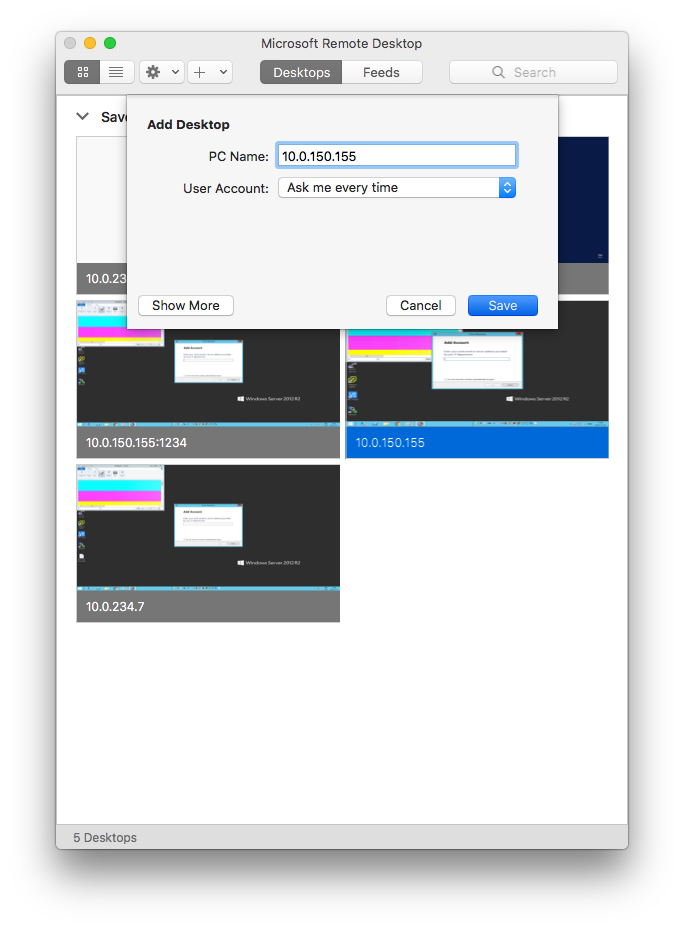
- Launch RDP client of your choice.
- Enter destination host IP address and RDP service port number.
- Enter user login along with the account name specified in the username string (
john_smith#admin_rdp_server) and password.

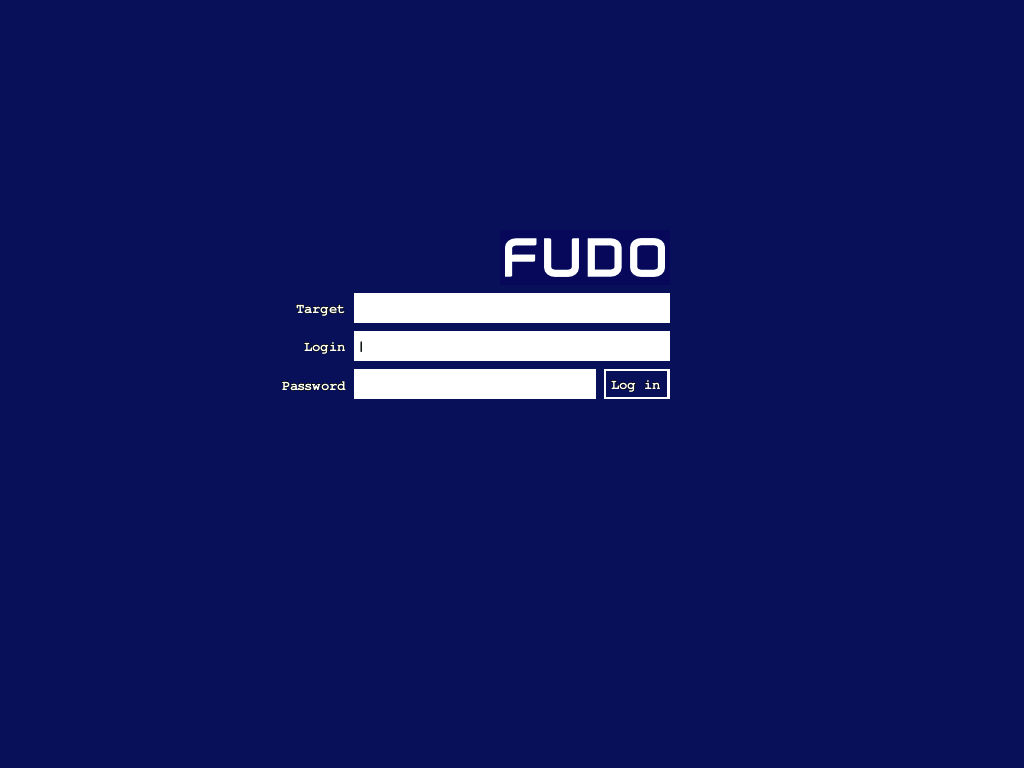
Note
- In case you do not specify login credentials, Fudo will display the internal login screen to enter the account name along with the username and password.
Viewing user session
- Open a web browser and go to the
10.0.150.151web address. - Enter the login and password to login to the Fudo PAM administration panel.
- Select > .
- Find John Smith’s session and click i.

Related topics: